
Introduction
In Microsoft Defender for Endpoint, Indicators of Compromise (IoCs) give security teams a way to extend detection and response: you can feed in file hashes, domains, or IP addresses and configure them to alert, block, or allow. It’s meant to be straightforward: If you allow something, Defender should stay quiet; if you block something, Defender should stop it in its tracks.
A customer recently reached out to me with a puzzling case: despite having allow rules configured, Defender still fired off alerts, and when they tried testing block rules, they didn’t work as expected. What should have been predictable behavior turned into a confusing mix of unexpected detections and unreliable controls.
That’s when I had to step in as a Defendective 🕵️♂️ - I knew pretty quickly this wasn’t some mysterious Defender bug. From experience, I’ve seen the same pattern plenty of times in the wild, and it usually comes down to something simple: a missing Intune policy. Sure enough, that was exactly the culprit here. It might look obvious on paper, but it’s one of those sneaky misconfigurations that keeps popping up again and again, so I thought this blog was worth sharing
(This isn’t anything particularly new or special, but rather something I encounter almost every month in various environments and should be seen as a onepager with all the informations you need to successfully deploy your custom IoC's 🎯)
🧩 Use Case
Our customer ran into a situation where Microsoft Defender began flagging a legitimate Line-of-Business (LOB) application during an update. This wasn’t a fresh installation - just a routine update - but the Anti-Malware Scan Interface (AMSI) integration with Microsoft Defender Antivirus stepped in and blocked it, causing unexpected false positives.
Fortunately, users could continue working, so there was no direct impact, but the interruption was frustrating, as updates are expected to deploy quickly (as it always goes in IT 😄).
At the time, IoCs had been deployed with the new File Hash which should be enrolled to prevent exactly this type of detection - but surprisingly, they didn’t work... lets get into it!

⚙️ Technical Description
An Indicator of Compromise (IoC) is a piece of forensic data that identifies potential malicious activity on a system or network. In Microsoft Defender for Endpoint, IoCs are used to detect, prevent, and respond to threats by correlating known malicious patterns with the telemetry collected from endpoints.
Even though Microsoft updates their IoC's in the back automatically depending on the threat landscape, custom IoCs let you respond more individually.
IoCs can include the following types:
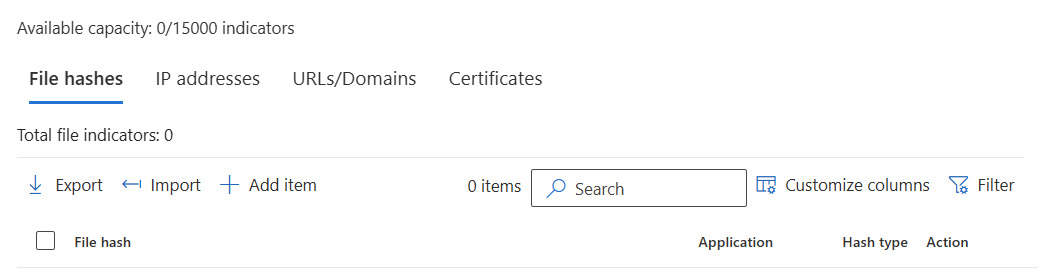
Security.microsoft.com > System, Settings > Endpoints > Indicators
File hashes
File indicators help stop the spread of attacks within your organization by blocking potentially malicious files or suspected malware. If you identify a suspicious portable executable (PE) file, you can block it, which prevents the file from being read, written, or executed on any device in your environment.
You can create file indicators in three ways:
- Through the settings page – manually configure indicators in the Defender for Endpoint portal.
- As a contextual indicator – use the “Add indicator” button directly from a file’s details page e.g. in an incident.
- Via the Indicator API – programmatically create indicators for automated workflows or integration with other systems.
The following Hashes can be used for your custom IoC's
- SHA-1
- SHA-256
- MD5 (not recommended)
Requirements
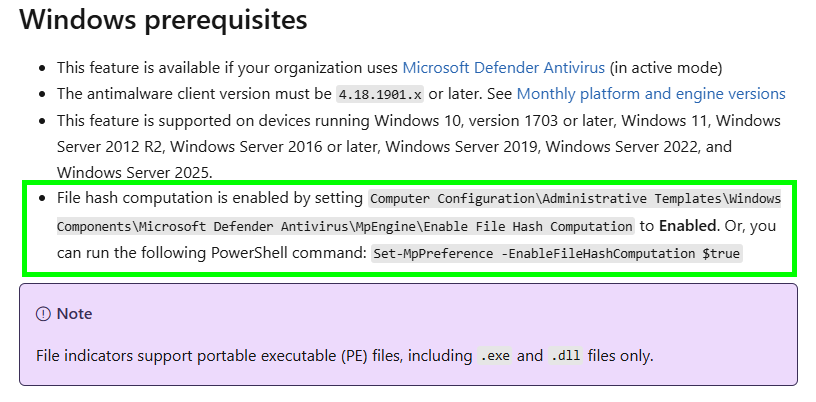
- This feature is available if your organization uses Microsoft Defender Antivirus (in active mode)
- The antimalware client version must be
4.18.1901.xor later. See Monthly platform and engine versions - This feature is supported on devices running Windows 10, version 1703 or later, Windows 11, Windows Server 2012 R2, Windows Server 2016 or later, Windows Server 2019, Windows Server 2022, and Windows Server 2025.
- File hash computation is enabled by setting
Computer Configuration\Administrative Templates\Windows Components\Microsoft Defender Antivirus\MpEngine\Enable File Hash Computationto Enabled. Or, you can run the following PowerShell command:Set-MpPreference -EnableFileHashComputation $true

IP addresses, URLs and Domains
By creating indicators for IP addresses, URLs, or domains, you can allow or block connections based on your organization’s own threat intelligence. You can also warn users if they attempt to open risky IP addresses, URLs or Domains. This warning does not prevent usage entirely users can choose to bypass it and continue running the app if necessary.
To block malicious IPs and URLs, Defender for Endpoint leverages:
- Windows Defender SmartScreen for Microsoft browsers
- Network Protection for non-Microsoft browsers and non-browser processes
- Microsoft-managed threat intelligence, which provides the default dataset for blocking malicious IPs and URLs
If you need to block additional threats beyond the default dataset, you can configure Custom Network Indicators to specify extra IPs, URLs, or domains.
Microsoft Defender AV requirements
Integration into Microsoft browsers is controlled by the browser's SmartScreen setting. For other browsers and applications, your organization must have:
- Microsoft Defender Antivirus configured in active mode.
- Behavior Monitoring enabled.
- Cloud-based protection turned on.
- Cloud Protection network connectivity.
- The anti-malware client version must be
4.18.1906.xor later. See Monthly platform and engine versions.
Network Protection requirements
URL/IP allow and block requires that the Microsoft Defender for Endpoint component Network Protection is enabled in block mode. For more information on Network Protection and configuration instructions, see Enable network protection.
Custom network indicators requirements
To start blocking IP addresses and/or URLs, turn on the "Custom network indicators" feature in the Microsoft Defender portal. The feature is found in Settings > Endpoints > General > Advanced features. For more information, see Advanced features.
For support of indicators on iOS, see Microsoft Defender for Endpoint on iOS.
For support of indicators on Android, see Microsoft Defender for Endpoint on Android.

Certificates
You can create certificate indicators in Microsoft Defender for Endpoint. Common use cases include:
- Allowing trusted signed applications: When deploying blocking technologies like attack surface reduction rules, you can add a certificate to the allowlist to permit legitimate behaviors from signed applications.
- Blocking specific signed applications: By creating an indicator for a certificate, you can prevent a particular signed application from running across your organization. Microsoft Defender Antivirus will block and remediate file executions, and automated investigation and remediation will handle these files in the same way.
Requirements
- This feature is available if your organization uses Microsoft Defender Antivirus (in active mode) and cloud-based protection is enabled. For more information, see Manage cloud-based protection.
- The anti-malware client version must be
4.18.1901.xor later. - Supported on machines on Windows 10, version 1703 or later, Windows Server 2025, Windows Server 2022, Windows Server 2019, Windows Server 2016, and Windows Server 2012 R2. NoteWindows Server 2016 and Windows Server 2012 R2 must be onboarded using the instructions in Onboard Windows Server 2012 R2 and Windows Server 2016 to Microsoft Defender for Endpoint for this feature to work.
- The virus and threat protection definitions must be up to date.
- This feature currently supports entering .CER or .PEM file extensions.
Important
- A valid leaf certificate is a signing certificate that has a valid certification path and must be chained to the Root Certificate Authority (CA) trusted by Microsoft. Alternatively, a custom (self-signed) certificate can be used as long as it's trusted by the client (Root CA certificate is installed under the Local Machine 'Trusted Root Certification Authorities').
- The children or parent of the allow/block certificate IOCs aren't included in the allow/block IoC functionality, only leaf certificates are supported.
- Microsoft signed certificates can't be blocked.

Available Actions
The table below shows which actions are available per indicator (IoC) type:
| IoC type | Available actions |
|---|---|
| Files |
Allow Audit Warn Block execution Block and remediate |
| IP addresses |
Allow Audit Warn Block execution |
| URLs and domains |
Allow Audit Warn Block execution |
| Certificates |
Allow Block and remediate |

While powerful, IoCs carry risks if misused:
- False Positives: Incorrectly flagged IoCs can block legitimate files, URLs, or domains, causing operational disruption.
- Overblocking: Overly broad indicators (e.g., entire IP ranges or domains) can impact business applications.
- Maintenance Overhead: IoCs must be reviewed, updated, and retired regularly, as outdated indicators may no longer be relevant.
- Security Risk: Sharing IoCs publicly without proper handling can inadvertently expose detection methods to adversaries.
Careful validation and testing are critical before deploying IoCs in production.
Configuration
Microsoft Defender for Endpoint provides several ways to configure and use IoCs - in this blog we will go with manual creation through the Security Admin Center:
File hashes
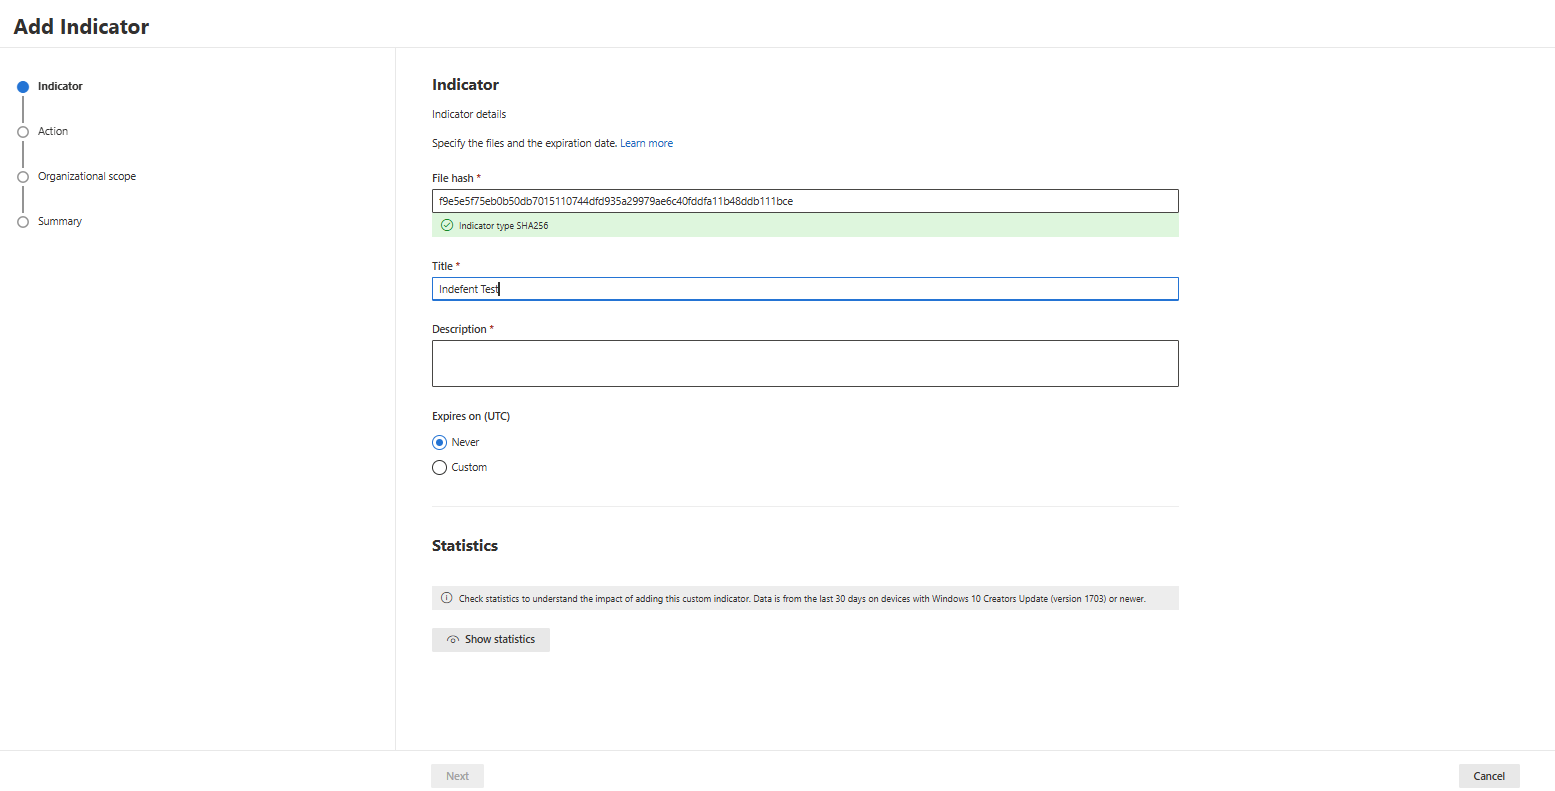
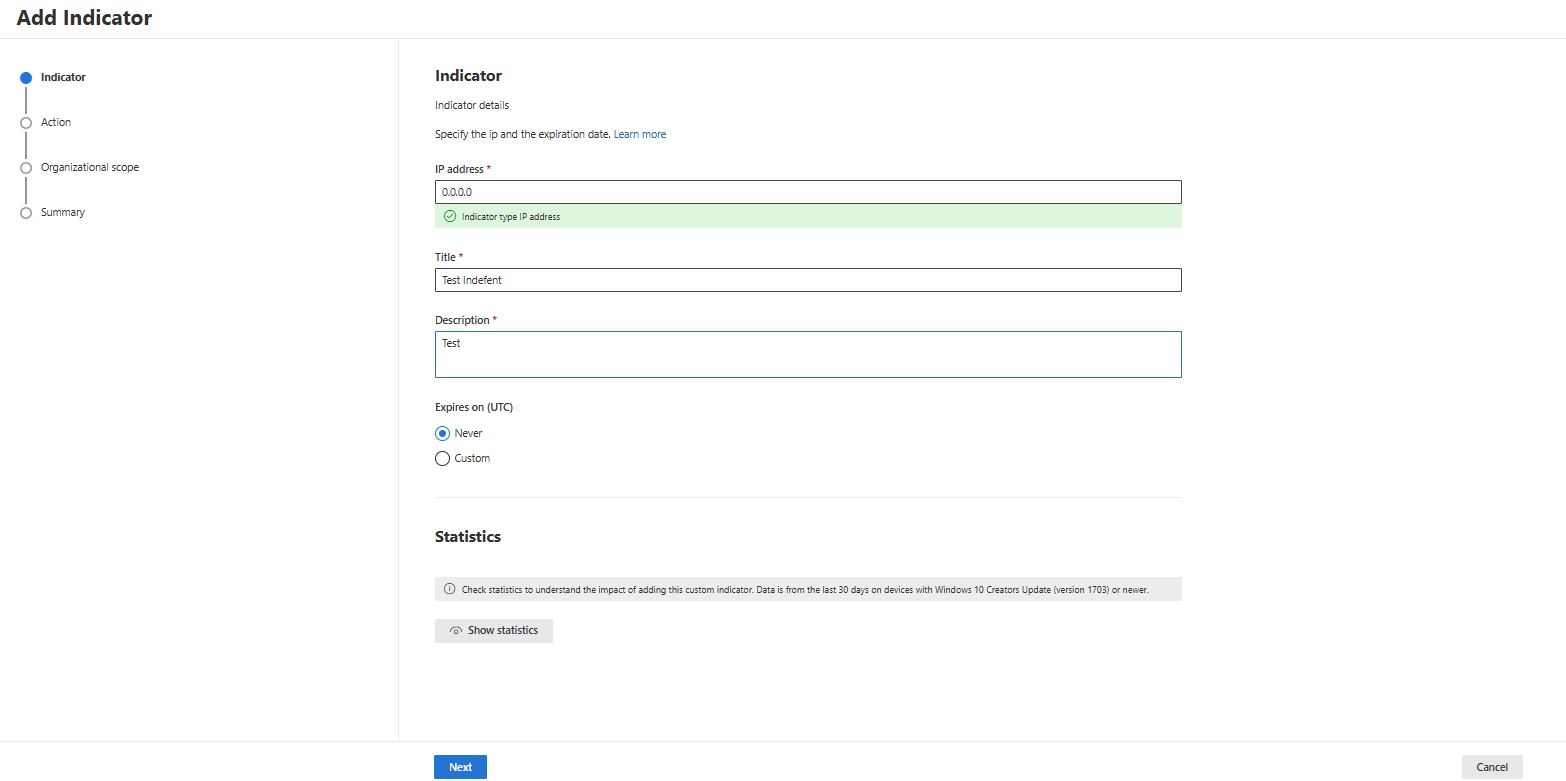
- Get the File hash of your File with Powershell or from an ongoing Incident and navigate to Security.microsoft.com > System, Settings > Endpoints > Indicators
Powershell
Get-FileHash "C:\path\to\file.exe" -Algorithm SHA256 | Format-List
- Create a File hash indicator:
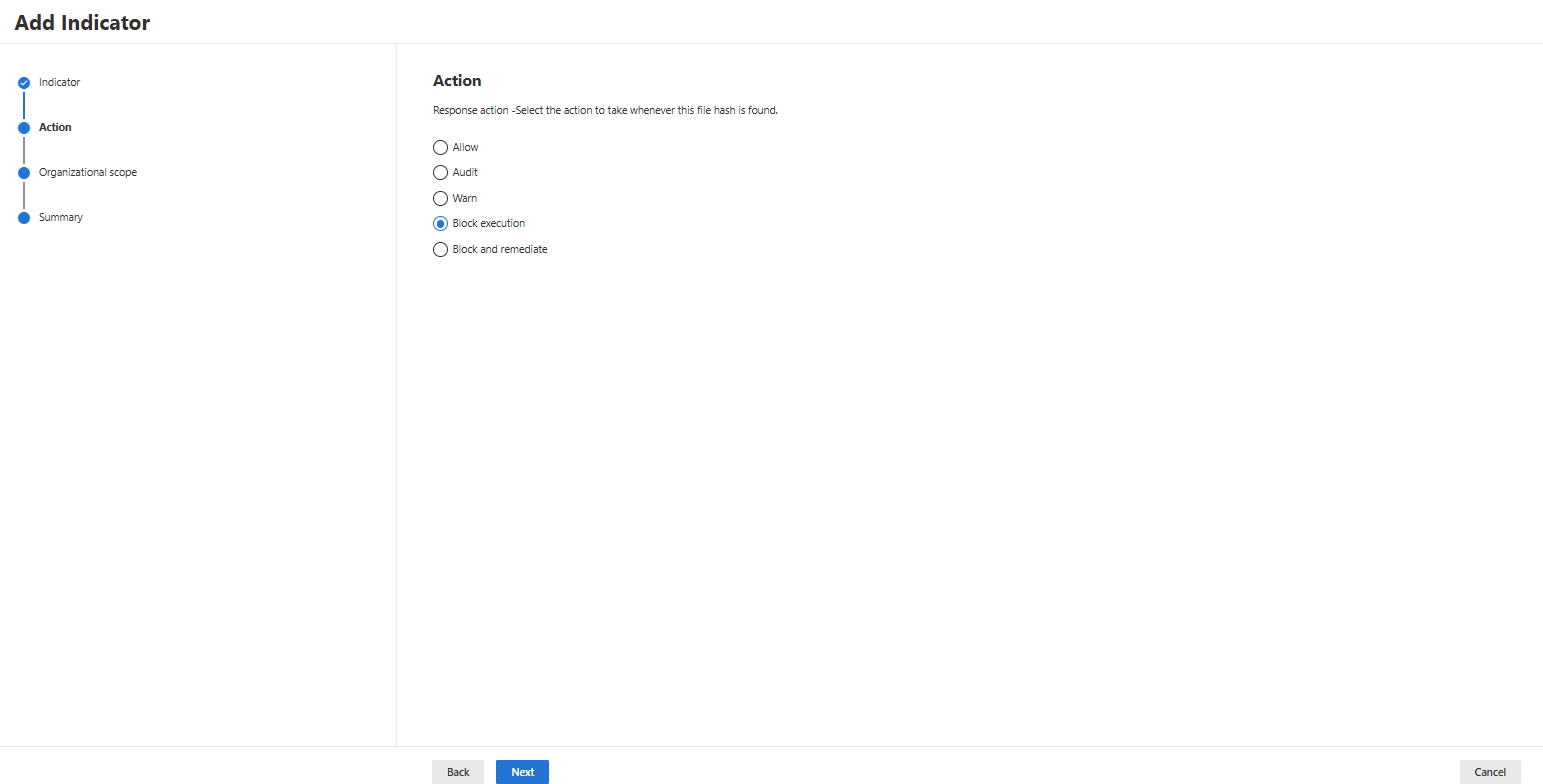
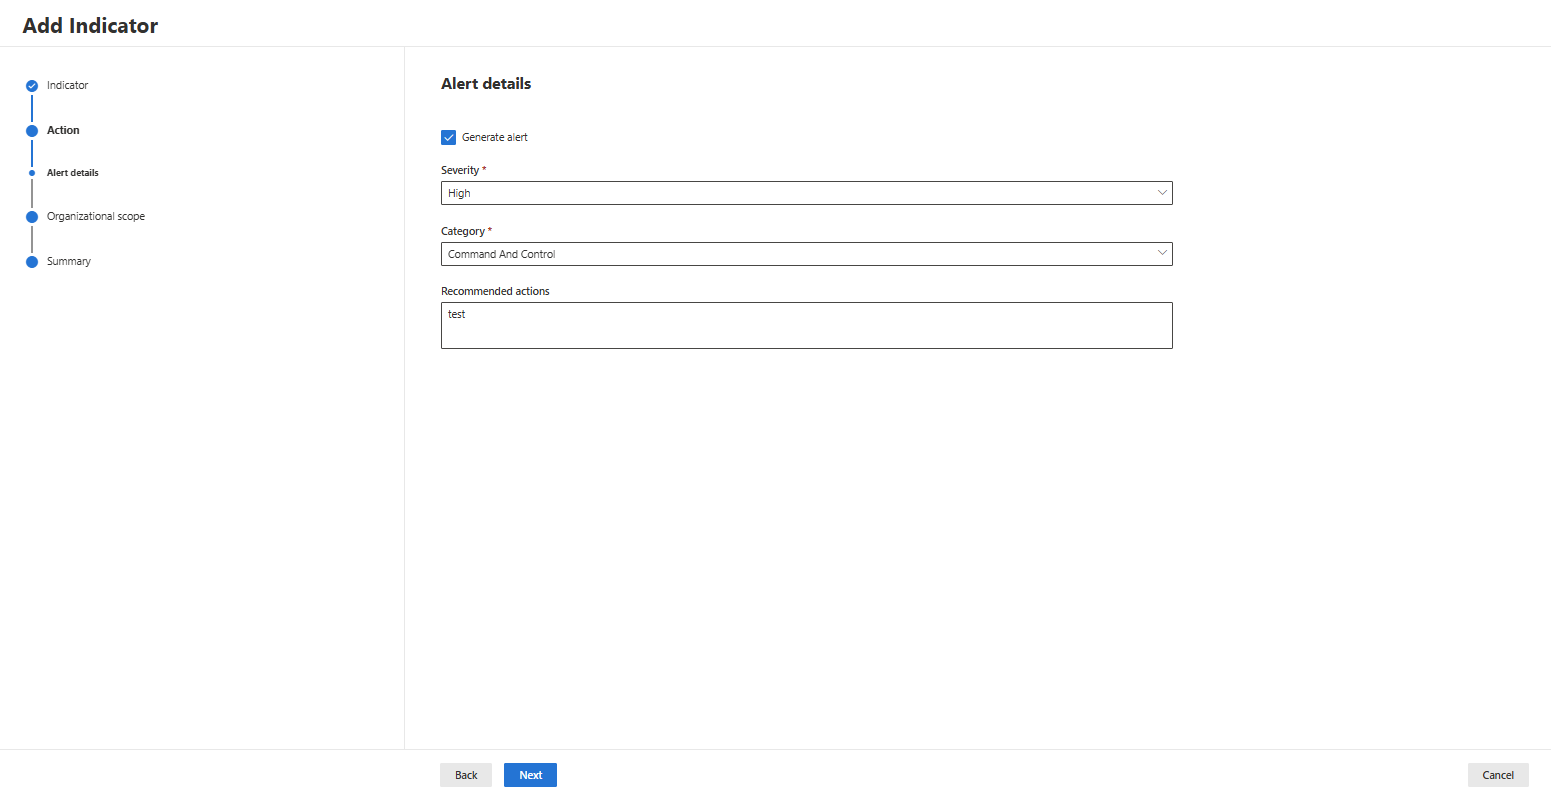
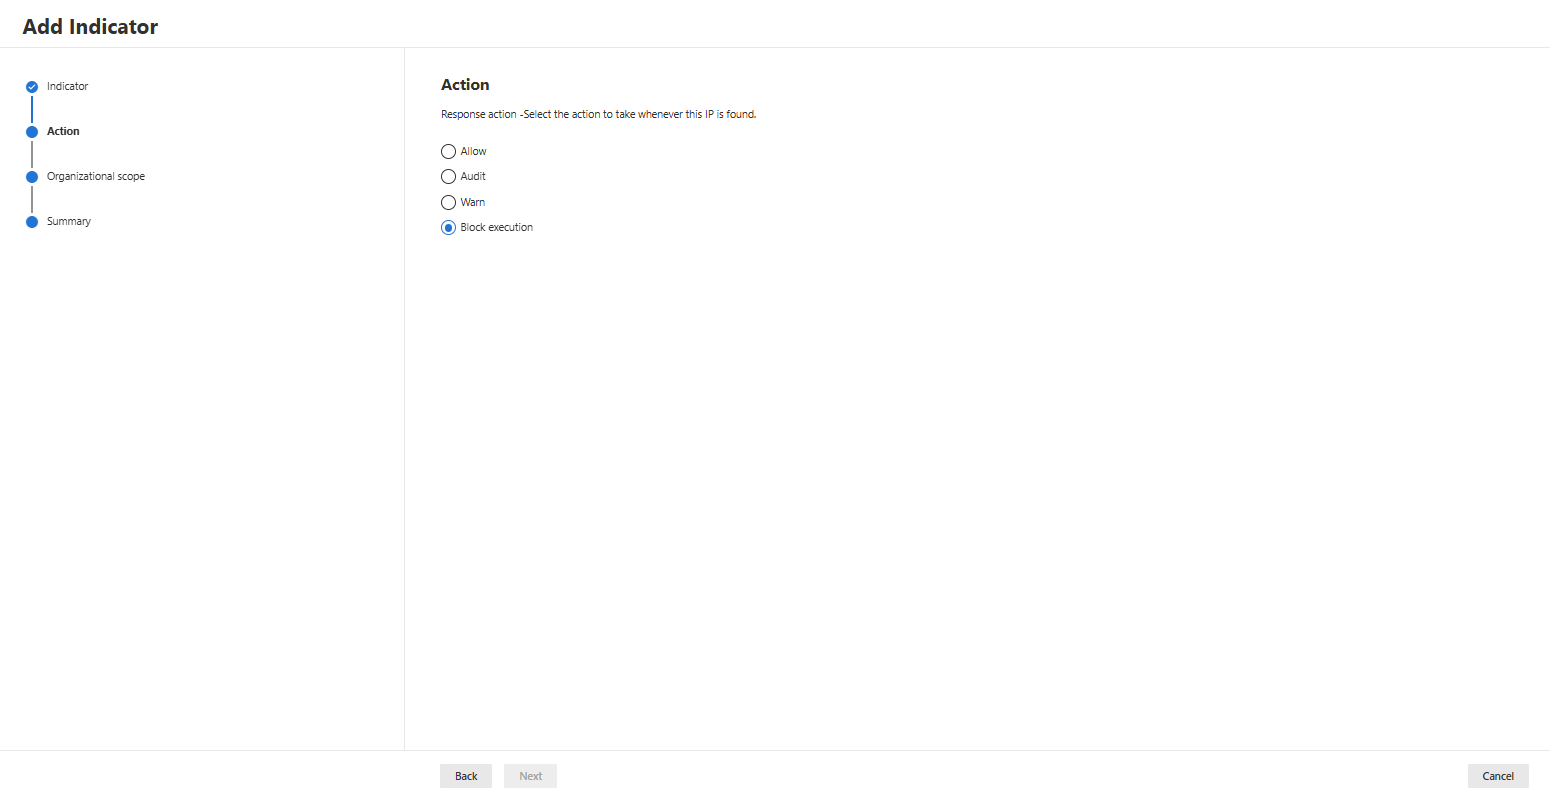
- Decide which action you want to take when your file hash is discovered (if you select a block action, you can select the severity as well):
- Decide whether you want to scope the Indicator to all devices or only to a device group
IP Adresses
- Get the IP you want to create a custom IoC and add the indicator:
- Decide which action you want to take when this IP is discovered:

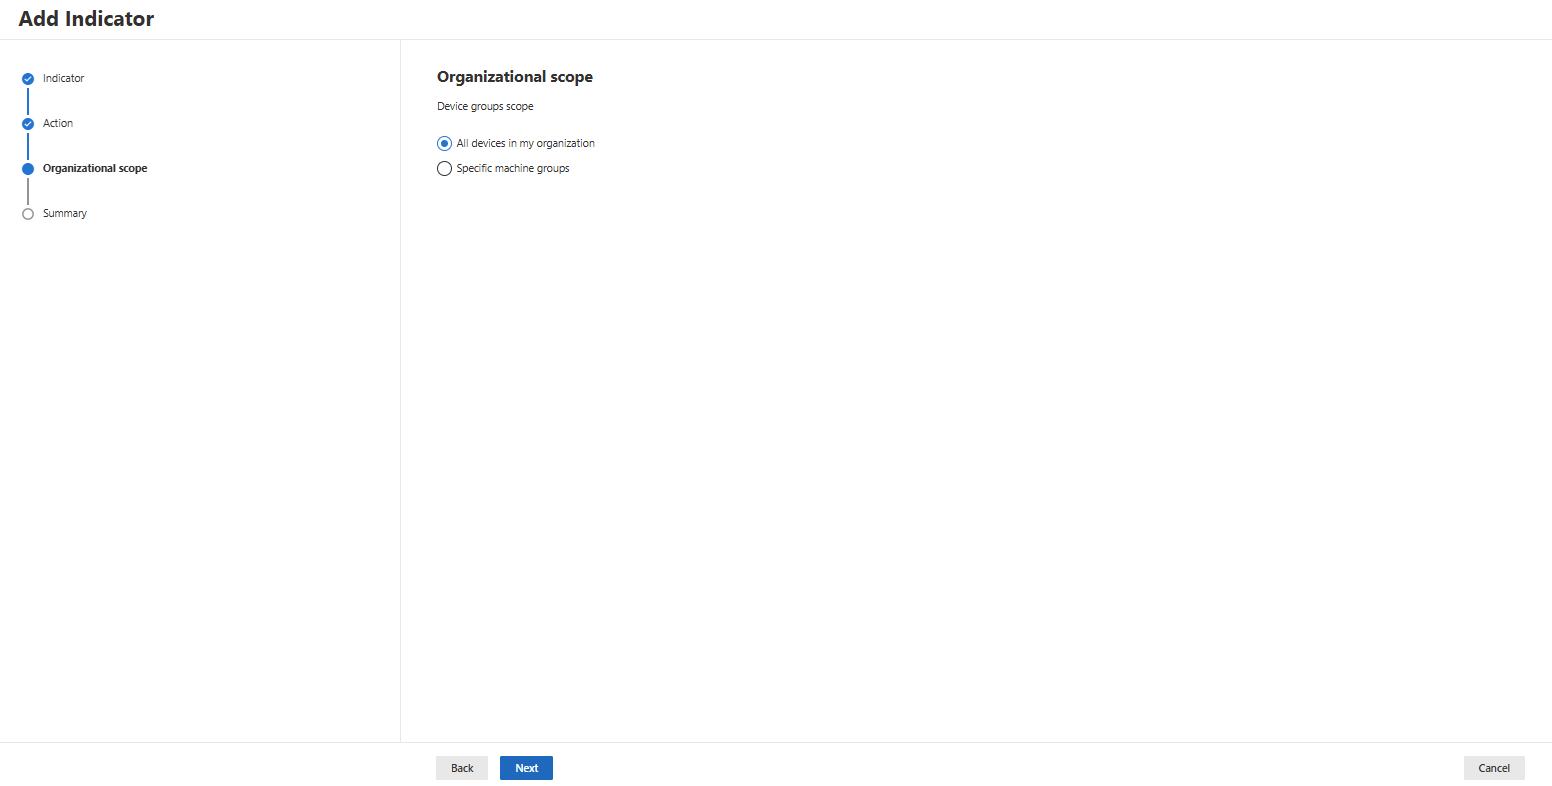
- Decide whether you want to scope the Indicator to all devices or only to a device group
URLs/Domains
- Get the Domain you want to create the indicator for and create the indicator
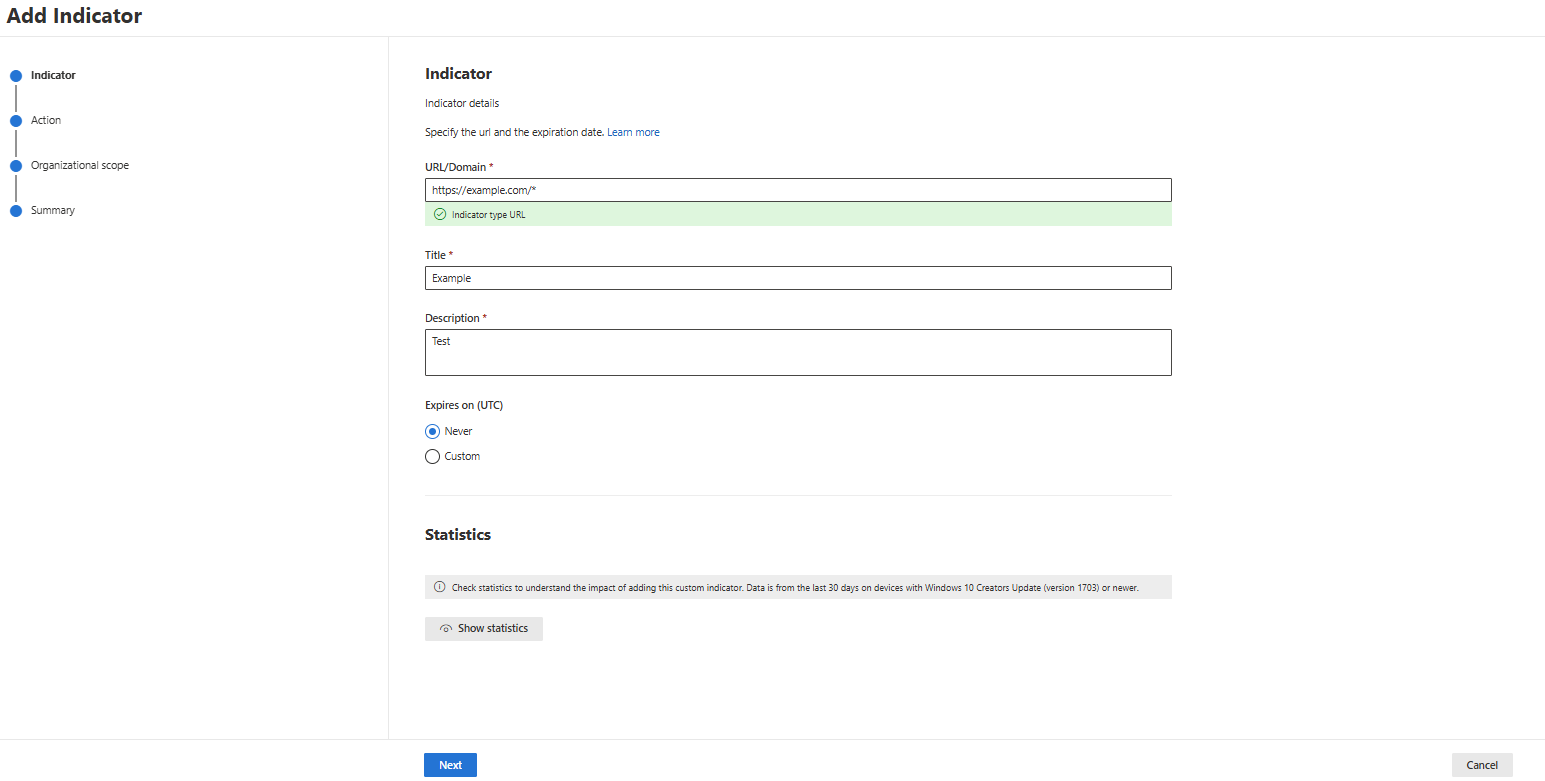
- Decide which action you want to take when this URL/Domain is discovered:
- Decide whether you want to scope the Indicator to all devices or only to a device group
Certificate
- Get the Certificate file you want to create the indicator for and create the indicator
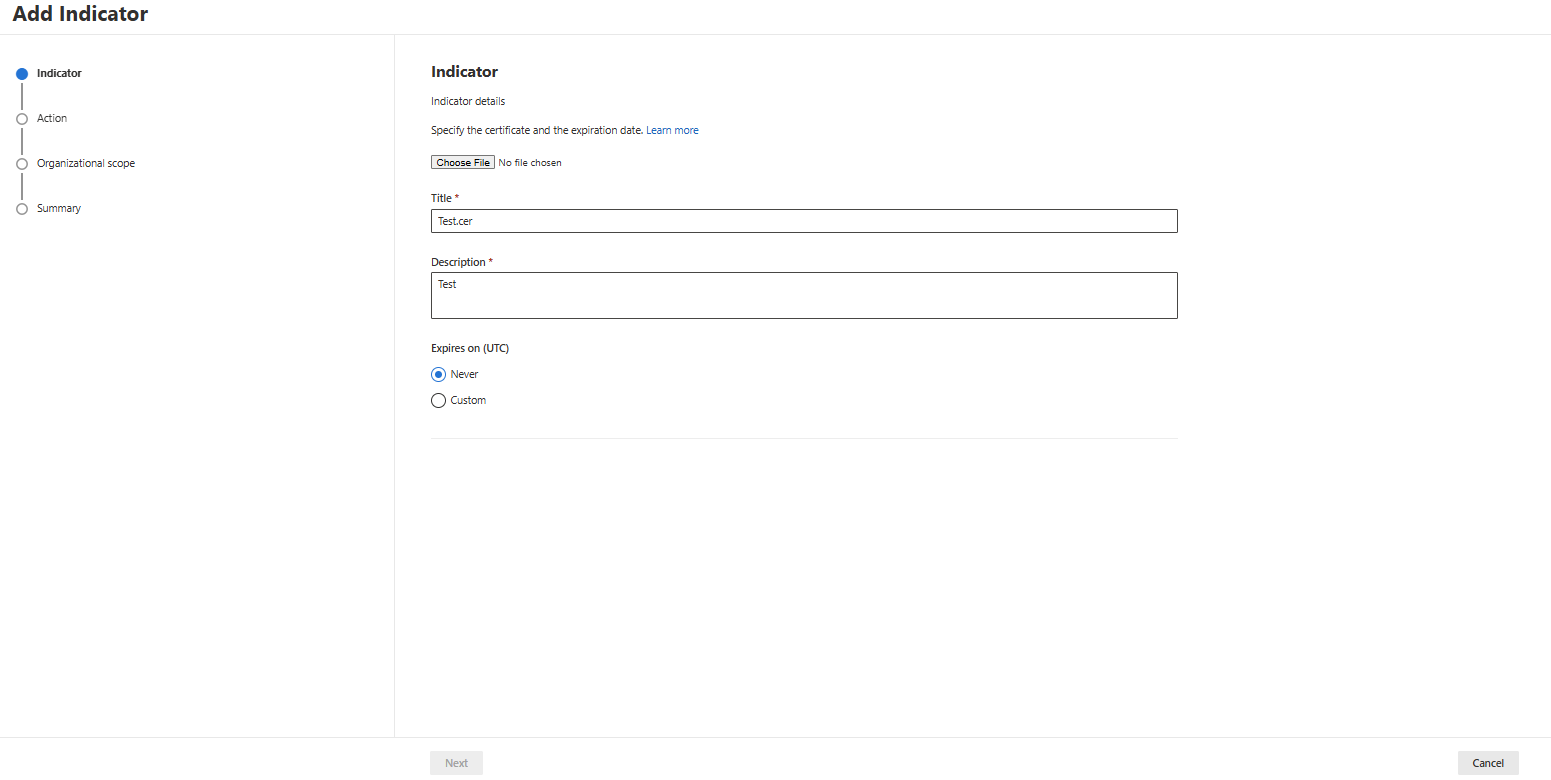
- Decide which action you want to take when this Certificate is discovered:
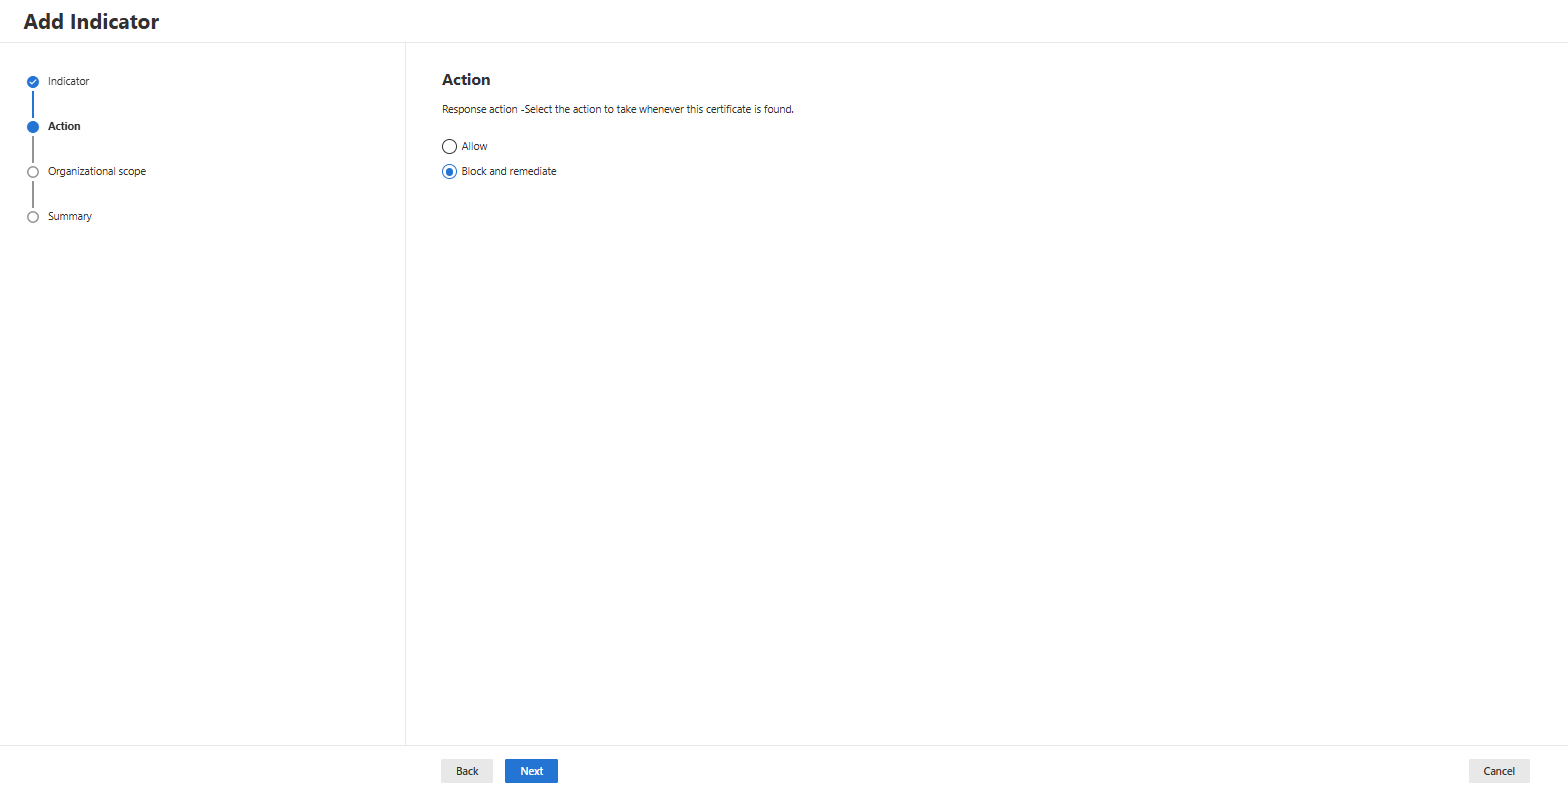
- Decide whether you want to scope the Indicator to all devices or only to a device group
Directly from an Incident
You can manage an Indicator right from an incident where a PE File and hash is available:

(If you have e.g. the Security Administrator Role you are able to create or managed the indicator - as I am not "pimed" its greyed out in my case 😄)
3rd Party Sources
Microsoft Defender for Endpoint seamlessly integrates with existing security solutions. The integration provides integration with the following solutions such as:
- SIEM
- Ticketing and IT service management solutions
- Managed security service providers (MSSP)
- IoC indicators ingestions and matching
- Automated device investigation and remediation based on external alerts
- Integration with Security orchestration and automation response (SOAR) systems

After reading this load of information, you should now have a solid technical understanding of Indicators of Compromise (IoCs) in Microsoft Defender for Endpoint, including the different types, available actions. You should also understand when and why to deploy IoCs to detect, block, or allow specific files, IPs, URLs, domains, or certificates in your environment.
With this foundation, we can now return to the use case and analyze why IoCs did not achieve the desired results in the context of our customer’s environment.
🧩 Case Closed
In the scenario mentioned earlier, there was a false positive block for a file hash. When navigating to the Requirements, you can see a particular setting that needs to be configured, either in Intune or via GPOs.
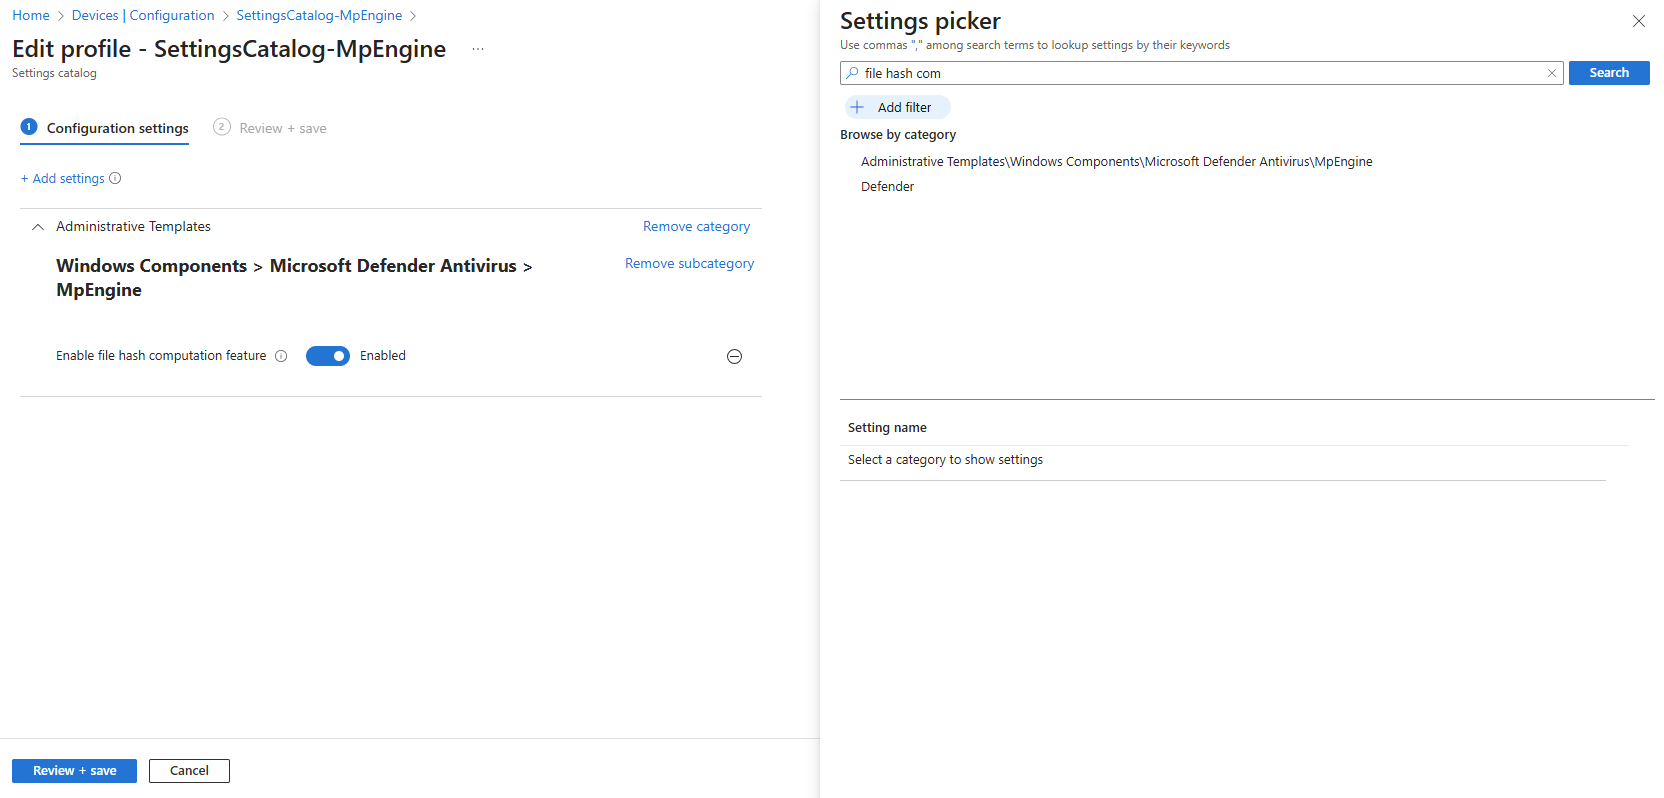
File hash computation is enabled by default, but enabling EnableFileHashComputation can significantly improve detection rates. Additionally Microsoft changed that from should in Oct. 2024 in their Documentation:
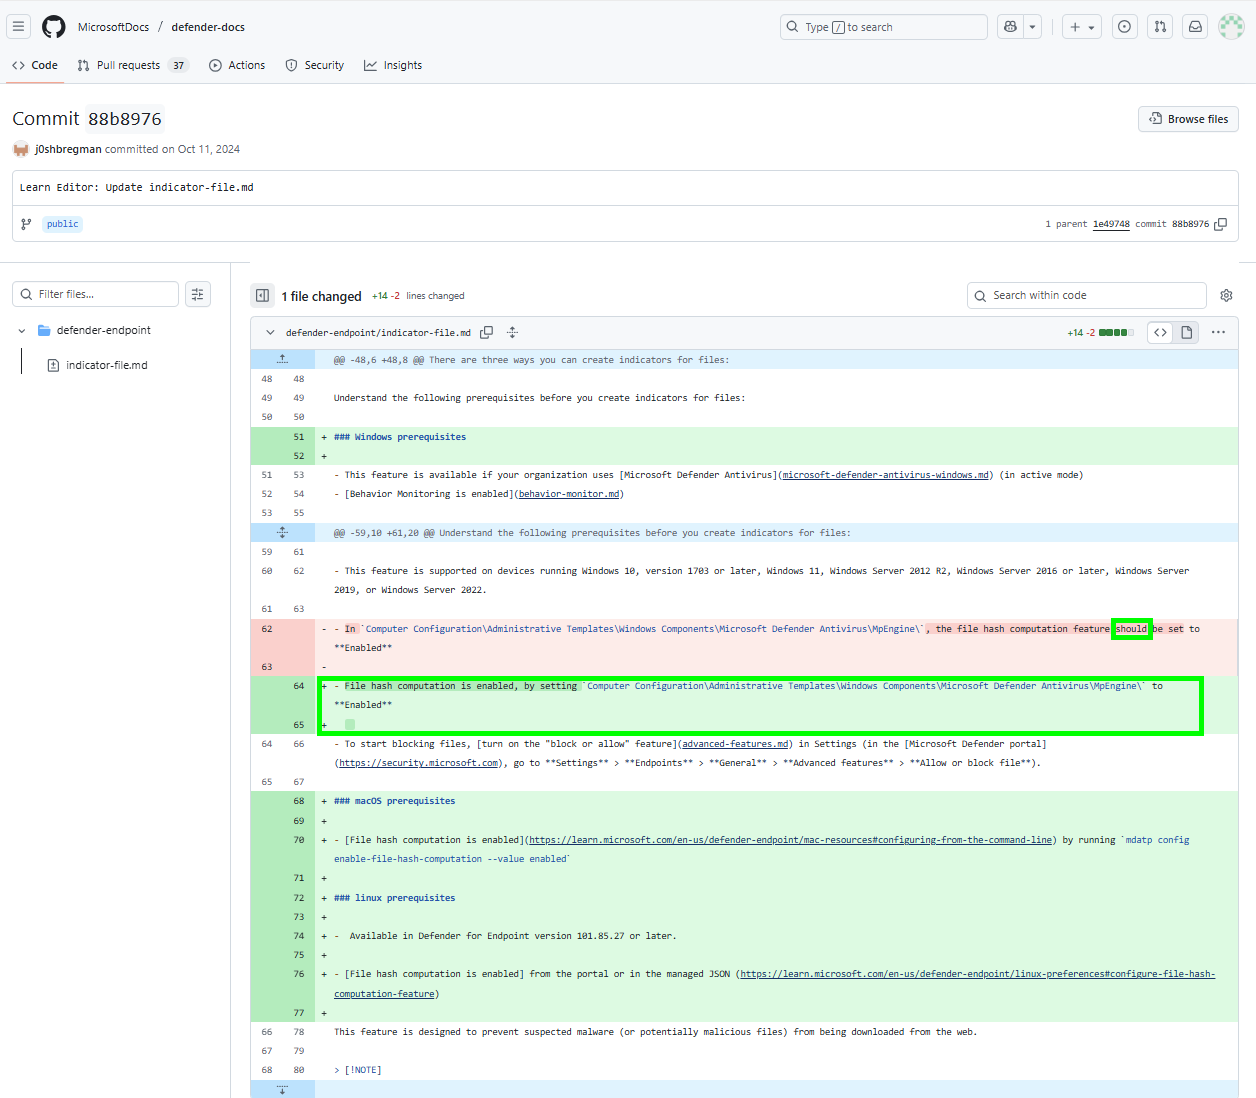
Once we deployed the File Hash Computation feature on the devices that actually needed it, the IoCs sprang to life like caffeinated squirrels and we started to party:

The key takeaway from this blog: always double-check the requirements before rolling out custom IoCs, roll them out carefully and only when really needed ;D
⚠️ Disclaimer
The configurations shared in this post reflect my personal approach to solving this specific challenge. Every environment is unique, so adapt these solutions to fit your needs.
Happy configuring! 😊


